All computers in the Saint Mary’s College clusters and
classrooms come equipped with CD Writing capabilities and software. Saint
Mary’s College uses Nero Express 6 to create CDs on MPC brand computers. If you are using a black Dell or an Omnitech computer, instructions for using Roxio Easy CD Creator 5 can be found at
http://www.saintmarys.edu/~clusters/clustersfaq/EZCD5/EZCD5.html. Creating CDs (or "burning") has never been
easier, and can be done from any of computer classrooms or labs on
campus. Following this brief introduction are some easy steps for
creating your own CDs!
First things first - an explanation of the different types
of writeable CDs.
There are two different types of writeable CDs: CD-R and
CD-RW. CD-R CDs allow you to write to them only once, but you can read
from the CDs over and over again. CD-RW CDs allow you to rewrite on the
CD many times, as well as read from them an unlimited number of times.
Both types of CDs can be used with Easy CD Creator 5, just make sure that you
don’t write to a CD-R more than once!
How do I create a CD using Nero Express 6?
- First
you need to launch Nero from your PC.
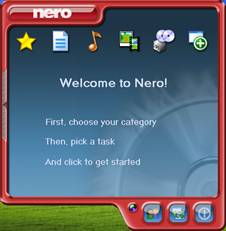
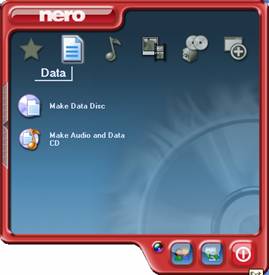
Click on your Start
button, and go to All Programs. Click on the CD-DVD folder and go to the Nero folder and click on Nero StartSmart. A screen like the one shown here will
appear.
|
|
|
|
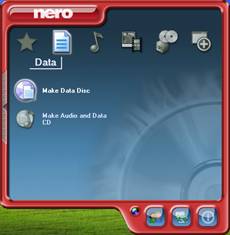
- Move
your mouse over the picture of the piece of paper as shown in the
example to the left. Click on the
icon next to Make Data Disc
to start creating your data CD.
|
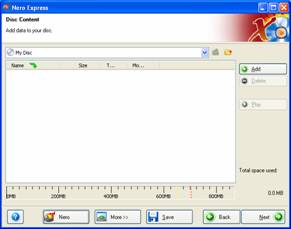
- A
screen like the one to the right will appear. You need to select which files need to
be on your CD first. Click on the
Add button to the right of
the screen to find the files you need on your CD.
|
|
|
|
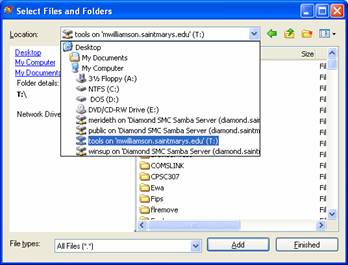
- You
will then see a screen like the one to the left. From here you can browse to the drive
and folder that contains the files that you would like on your CD. Start by dropping down the Location box and selecting the
drive that contains your files.
Here I am using files from my “T:” drive, but you most likely
will be using files from your “H:” or “C:” drive. Then open the folder that contains
your files.
|
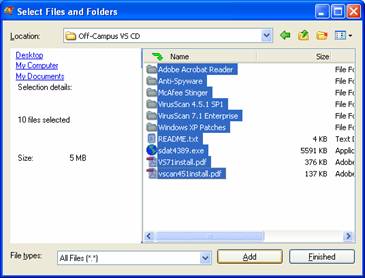
- Once
you have found the files that you want on your CD, select them using
your mouse. If you hold down the
“Ctrl” key while selecting files, you can select more than one file at a
time. Once you have finished
selecting all of the files you want in a folder, click on the Add button shown here. Then navigate to the folder(s)
containing any other files you would like on your CD, and repeat the
process above to select and add the files. Once you have all the files that you
need, click on the Finished button to continue.
|
|
|
|
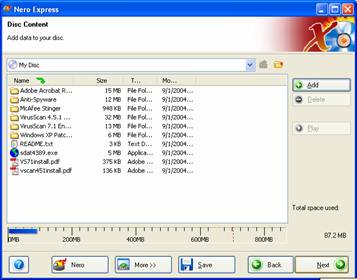
- Now
we are back to the screen shown in Step 3. Notice toward the bottom of the screen
a graphic that looks like a ruler, which lets you know how much space
your files take up and if you are close to the space limit of your
CD. Make sure that your selected
files do not go past the red dotted line (700 MB), and click on the Next button to continue.
|
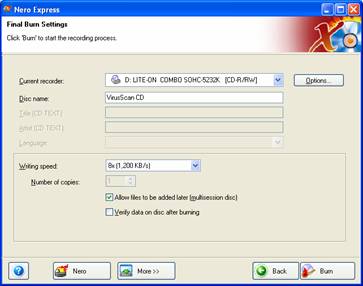
- The
screen below will finalize your settings before you actually start
creating your CD. You can type in a
specific name for your CD in the Disc
Name: text box. Also make sure
that your writing speed is set to 4x or 8x if you
are planning on reading this CD on an older computer, more than a couple
of years old. Once you have
finalized your settings, click on the Burn
button to start burning your files onto your CD.
|
|
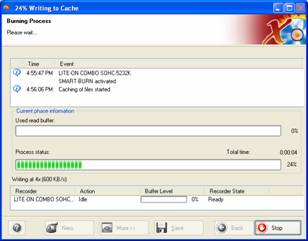
- A screen
like this one will appear while your CD is being created. It may take several minutes to burn
your CD, depending on the amount and size of the files you are
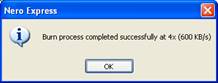
using. Once all the files are on
your CD, a box will pop up saying that the process has completed. Click on the OK button, and then click on Continue (which will appear in place of the Stop button shown here).
|
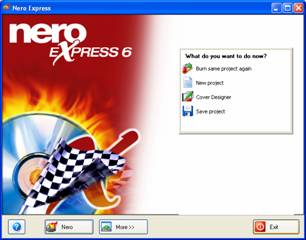
- Nero
will now ask what you would like to do next. If you would like to burn another CD
with the same files, click on Burn
same project again. If you
would like to create another CD with different files, click on New Project. If you would just like to close out
the program, click on the Exit
button in the lower right hand corner.
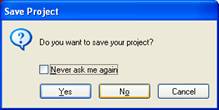
Nero will ask you if you would like to save your project. Click on the No button.
|
|
|
|
10. Once you have
finished creating your CD(s), our original screen will appear. Click on the red button in the lower right
hand corner to completely exit out of Nero.
You have now successfully created a data CD!
|